You love your golf cart, don’t you? Of course, if you want to keep it running smoothly, then cleaning is one task that needs to be done. Cleaning your golf cart is more than just running the hose over it and squirting on car-wash soap. There are a few things you’ll want to take into consideration for the best results!
Cleaning your golf cart can be tedious, but these simple steps will help make it easier. With this guide, you’ll be able to do everything from basic cleaning to all of those tough stains!
Step 1 – Get Your Cart Ready
First, remove anything that could get in your way or damage during cleaning. You should ensure that the interior is free of any equipment or items that could be ruined by water. This includes GPS systems and any personal items stored inside dashboard storage. And make sure there isn’t trash around before starting. Also, shield any electronic components that might be damaged by moisture. Before starting, you should also make sure that the cart is off.
Step 2 – Preparation
To give your golf cart that pristine look, it is important to park in a shady location before washing. The direct heat and sunlight can dry out soap spots on the vehicle’s finish too quickly! Before you start cleaning, ensure the right tools are at hand. Some surfaces require specific products, and others will do just fine with a different set of equipment together! The following items should help make this process go as smoothly as possible:
Bucket Liquid dish shop Freshwater Rubber gloves Microfibre towels Paper towels Soft brush Plastic shine or polish
Step 3 – Clean the Interior
Clean up using a broom, vacuum, or leaf blower. To properly clean, mix the soap in some clean water and dip a microfiber towel into the soapy mixture. Do not use harsh detergents. Wipe down all plastic on the cart, including cup holders, dashboard, etc. Next, use a damp cloth or sponge to wipe off the soap.
Pro Tip: Instead of old rags or t-shirts that are too rough for this task, use microfiber towels and mitts, which will be much kinder!
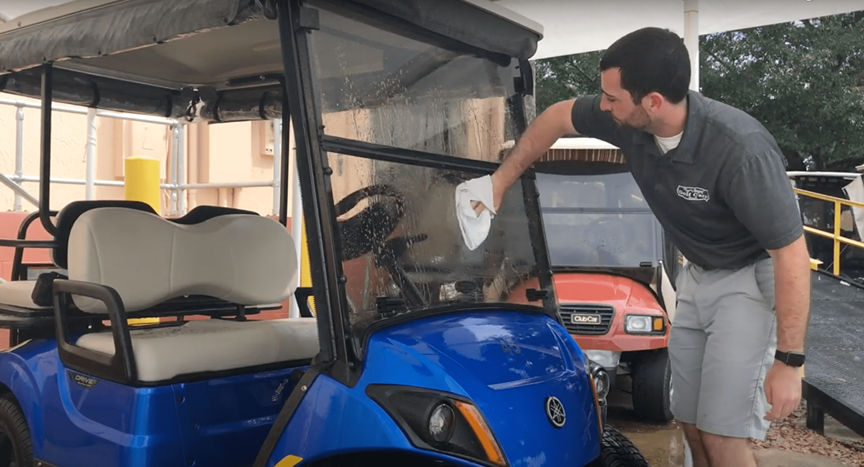
Step 4 – Clean Windshield
The golf cart windshields are often polycarbonate or acrylic. Unfortunately, these materials scratch easily, so you’ll need to give extra care when washing this part. The glass cleaner and paper towels won’t work well on this because they’ll scratch up easily; instead, use warm water with the same microfiber towel.
Step 5 – Clean Seats
When the vinyl seats on your golf cart grow mold or mildew, it can seem impossible to clean. However, just one part of bleach mixed with two parts of water applied using a sponge will solve this problem!
Step 6 – Clean the Aluminium
You will want a dedicated cleaner for the aluminium part of the body. There are spray-on products or ones that can be applied with sponges and towels; either way, it’s important to use this liquid followed by rinsing off thoroughly. You can apply an aluminium polish if you want (this will help restore shine).
Step 7- Clean Underside & Wheels
Wheels and underside of a golf cart is prone to accumulating dirt and mud because of where they are. A simple water hose wash will get the job done, but if you want better results, use some spray and a wire brush to clean rust. No chemicals are needed here, just plain tap water should do it!
Step 8 – Clean the Battery
You may not think that dirt, grease, and corrosion can damage your golf cart’s battery, but it is true. Over time, these elements can cause damage to your battery terminals, which can lead to poor performance and even failure. To clean the battery, use a mixture of baking soda and water. Make sure to rinse the terminals thoroughly with water and dry them off before reapplying the terminals.
Step 9 – Apply Protectant
After cleaning, it’s a good idea to apply a protectant to the vinyl seats and other plastic surfaces. This will help to keep them looking new and prevent cracking or fading.
Step 10 – Final Touches
Once you’ve cleaned and protected your golf cart, it’s time for the final touches. This includes polishing the aluminum, wiping down the tires, and ensuring that all the windows are clean and clear.
Pro Tip: Keep a bucket of soapy water on hand when cleaning your golf cart to help make the process go faster!
By following these simple steps, you can keep your golf cart looking like new and ensure that it runs smoothly for years to come. Remember that regular cleaning and maintenance is key to keeping your golf cart in top condition. So, take the time to clean your cart, and you’ll be able to enjoy it for many rounds of golf to come!